A Premium Subscription is required to use the Classic Optimizer. Access the Classic Optimizer here.
Introduction #
If you’ve used an optimizer before, hopefully our Classic Optimizer will feel relatively familiar. If not, no worries – we are here to help! The basic idea of an optimizer is to produce the best possible lineups for you (maximizing projected points in a lineup) based on the rules and guidance that you feed in to the optimizer. With the Run The Sims Classic Optimizer, you can modify your projections source (baseline projections, median, ceiling, etc.), select stacks, lock players into every lineup, exclude players from lineups, etc. You can even force the optimizer to prioritize salary spending at different positions! Let’s dig in.
Wanting to build single-game/showdown lineups? You’ll do that in the DIY Simulator HQ – not in the Classic Optimizer.
Video Tutorial #
Player Pool #
Filter by Position: Click any position in the top left corner to view only that position. Click it again to return to a view of all positions.
Filter by Game/Team: Searching for a particular team or game situation? You can filter by clicking the team name in the schedule portion at the top of your screen. Click on the date/time below the game in the schedule area to view all players from that game (from either team). As always, click again to reset.
Lock Button: You’ll often want to “force” players into your lineup builds. Use the “lock button” to guarantee certain players into every lineup. Warning: using the lock button excessively can really limit the optimizer’s ability to create lineups.
Exclude Button: Another thing that happens a lot is that you’ll end up getting a lot of a certain player. He grades out really well, but you just don’t like him. Click the “exclude button” to guarantee that they don’t show up in any lineups.
Projection Sources: The optimizer comes loaded with our baseline projections, but you may wish to utilize one of our other projection sources. We currently offer floor (10th%), median (50th%), 75th%, and ceiling (90th%) projections for every player on every slate. Simply click the double arrow next to your preferred projection and the optimizer will build with those numbers.
Modify Projection: You may disagree with our projections – and that’s good! Bringing your own spin to a slate can be super advantageous. To change a player’s projection, simply click in his corresponding ‘Proj’ textbox and key in the value of your choice. This will automatically save as soon you click anywhere else on screen.
Modify Exposure: While the “max exposure” in the settings can allow you to change player exposures in bulk, you can allow more/less max exposure to any player using the “MAX” column textbox in the player pool. This will automatically save as soon you click anywhere else on screen.
Reset Projections/Exposures: Since projection and exposure changes save automatically, you can also reset these by clicking the “Refresh PROJ” or “Refresh EXP” buttons accordingly. They will return to your default settings.
Color Scale: Sometimes it is helpful to add visualization to help make sense of the data. Click “Color Scale” to add conditional formatting to the data in the player pool. Remember green is good – red is bad.
Download Data: Click the “Download POOL” button to get all of the information in the player pool available as a handy CSV.
Stacks #
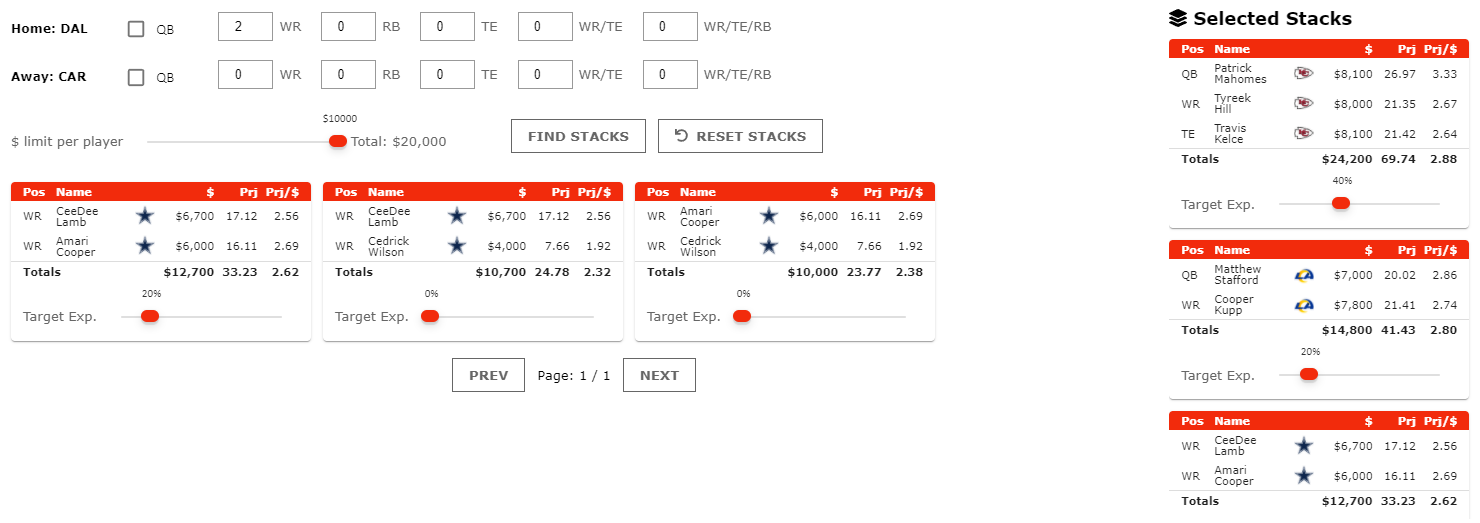
A stack is a combination of players from either the same team (team stack) or the same game (game stack). Stacks are a great way to add correlation to your GPP lineups.
To make a stack, choose a game from the slate. For this example, we’re choosing Kansas City. We’re looking for a stack of Mahomes + Hill + Kelce so check off the KC QB, 1 WR, 1 TE, and click Find Stacks.

You’ll see resulting options like this:
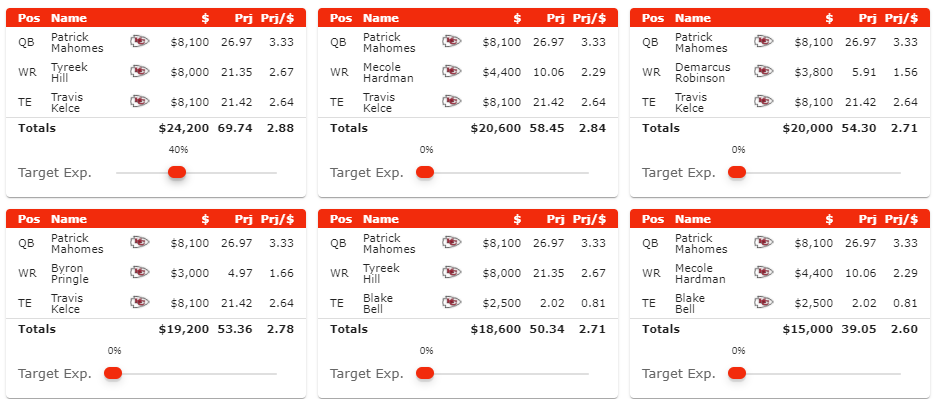
Move the Target Exposure slider to your desired exposure. We’ve picked 40% exposure for this stack. Your selected stack will show in the list on the right. Continue adding as many stacks as you require.
Saving Stacks #
Stacks automatically save per slate, per week. If you make stacks on the DraftKings Main slate, they will remain stored in your session for the duration of that slate’s availability, but will not be visible on other slates.
Player Groups #
Settings #
Default settings are shown below.
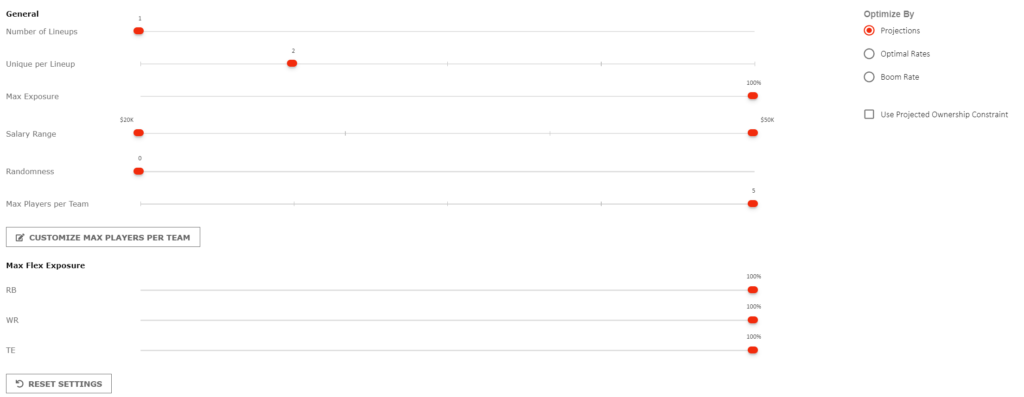
Number of Lineups: How many lineups the optimizer will generate.
Unique per Lineup: How may unique players should exist per lineup. Helpful for making sure your lineups are not too similar to one another.
Max Exposure: Max exposure per player across your selected number of lineups. For example, a max exposure of 40% ensures that no players from the player pool will appear in more than 40% of your lineups unless you have “locked” a player in, used a player(s) in a stack, or modified their max exposure individually in the player pool.
Max Players per Team: How many players will you allow from the same team in the same lineup? This helps diversify your lineups.
Salary Range: Choose the salary range for your lineups. Don’t want any $50K lineups? Set your max to $49,900 here. Warning – making modifications to salary range can hinder the quality of your lineups.
Randomness:
Max Flex Exposure: Do you have a preference for certain positions in the FLEX? If so, you can make those preferences known here. To guarantee a running back in the FLEX, simply set WR and TE to 0% with RB at 100%.
Customize Max Players Per Team: This opens a sub-menu where you can customize the minimum and maximum number of players from any one team that you would like included in lineups.
Use Projected Ownership Constraint: If ownership for this slate is available, limit the results to the constraints configured here.

